The article will guide you with the integration by using the Generic Rest Adapter of APPSeCONNECT for better business analytics and data monitoring. The purpose is to give knowledge on how Generic Rest Adapter could be implemented easily for integration between chosen applications. Here the chosen applications are – QuickBooks and Shopify.
- Introduction
- Background
- Business scenario
- Prerequisites
- Acquiring QuickBooks Credentials
- Acquiring Shopify Credentials
- Steps to Integration
- Technology App Creation
- Schema Addition
- Endpoint Configuration & Action and Error filter Configuration
- Endpoint Configuration
- Action Filter Configuration
- Error Filter Configuration
- Connection Creation
- Workflow Creation
- Mapping of the created Touchpoint.
- Validating credentials for Generic REST Application – QuickBooks
- Connection Deployment and Environment Setup
- Executing the Workflow
- Conclusion
- Things to Remember
- References
Introduction
Integration is one of the most common needs for driving any business successfully. We invest a lot in finding the best tools that can help us to seamlessly sync up information between applications. APPSeCONNECT is one such integration platform, which provides a simplified approach to capture data, connect disparate applications and perform actions.
In this article, we will discuss some of the important facts that you must consider while working with APPSeCONNECT, as the integration tool to sync data between applications. We will go ahead and configure the APPSeCONNECT platform to connect QuickBooks with Shopify.
Do you have multiple systems running? Connect all your business applications under one single platform to automate the business process and increase your productivity and efficiency!
Background
Integration of the applications with real-time data is done to maintain proper records of the business fulfilled and transacted by the organizations. Users for various domains require an integration process to get an analysis of the business data to make the business flow run with greater outputs.
ETL tools were used previously to integrate applications but now with the presence of iPaaS applications, data integrations are much easier, simpler and robust. Modifications in data are also updated automatically without any manual efforts. Also, with the introduction of Cloud integrations, iPaaS has reached greater heights making iPaaS platforms more robust. Business scenario
In this article, we will discuss the integration of QuickBooks with an ecommerce application Shopify. This article will guide you to integrate these apps right from the scratch. In the market, there is almost no readymade template for QuickBooks & Shopify, but customized integration is pretty much available in the market.
There are many organizations that promise to have customized integration solutions but APPSeCONNECT provides their users to integrate any custom REST-based applications easily using APPSeCONNECT generic REST adapter. To know more about the APPSeCONNECT generic REST adapter, Click here.
Prerequisites
Before, integrating using APPSeCONNECT, you must undergo a few pre-requisites for establishing integration between applications that are using generic RESTful APIs. As mentioned in the beginning, the example of QuickBooks cloud application integration with Magento2 has been taken in this article to explore the features that APPSeCONNECT offers to make connections simpler. So, from both the endpoints there are certain pre-conditions that are required to be fulfilled. Let’s have a look:
- You must have a valid QuickBooks developer account.
- You must have a valid QuickBooks account.
- You must have valid credentials for the Magento2 account.
- You must have a registered account with APPSeCONNECT.
Acquiring QuickBooks Credentials
Follow the steps to get the QuickBooks Credentials:
- To access QuickBooks API, you need to register to a QuickBooks developer account. Click here to register to the QuickBooks developer account.
- Provide account details and create the developer account.
- Once you have created the account, you will get an account activation mail. Activate the Account and move to the Applications section on the QuickBooks developer page.

4. Provide the application details and redirection URL for the application. In this case, the redirection URL will be the APPSeCONNECT portal URL, i.e. portal.appseconnect.com, as you will be using the APPSeCONNECT platform for integration.
5. Click the “Create App” button.

Note The generated client id, client secret and redirect URL will be used later during credential configuration while using APPSeCONNECT.
- Keep note of the Vend store URL, as this information will be required for configuring QuickBooks in APPSeCONNECT. You will get the information by signing here.
- After signing in, you will be directed to your store. Click here for more information on Authorization.
Acquiring Shopify Credentials
For configuring the Shopify app in APPSeCONNECT, you require the following basic information’s:
- Base URL of your Shopify store
- Admin credentials


Steps to Integration
Below are the steps in brief, which we need to follow to integrate QuickBooks (Generic REST app) with Shopify without using any predefined template and fully customize it according to your own requirements.
| Steps Involved | Actions Involved |
| Step 1 | Technology app Creation |
| Step 2 | Schema Addition |
| Step 3 | Endpoint & Action and Error filter Configuration |
| Step 4 | Connection creation |
| Step 5 | Workflow Creation. |
| Step 6 | Validating credentials for Generic REST Application – QuickBooks.
|
| Step 7 | Connection Deployment and Environment Setup. |
| Step 8 | Execution of the workflow. |
Before you go through the steps below in detail, the prerequisites must be fulfilled.
1. Technology App Creation
To Perform the integration between QuickBooks and Shopify, you must add both the apps in the APPSeCONNECT Portal.
- Steps to add Shopify to your APPSeCONNECT Account. Click here to know about adding applications in APPSeCONNECT.
- Select App from the left navigation panel.
- Click Choose App.
- Search for Shopify -> Choose the version ≥ 1.0.0.0
- Click Save.
Note: Shopify is a pre-packaged app of the APPSeCONNECT integration platform, so you will find that app directly from the app listing page. Follow the steps to add the prepackaged app.
- Steps to Create Technology App in the APPSeCONNECT Portal. Click here to know about the creation of the Technology Application.
- After you have chosen the natively supported App, click on Choose Apps dropdown
- Choose the “Create Technology App” option.
- Provide the Application name, description and type as per your requirement.
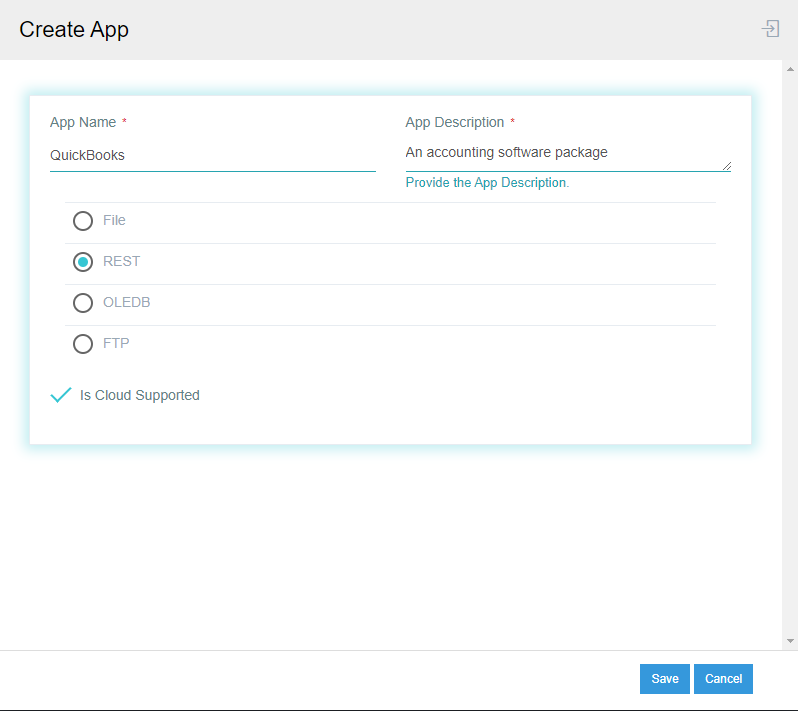
Note:
- QuickBooks is not a pre-packaged app of APPSeCONNECT. So, to integrate QuickBooks via APPSeCONNECT you will get an option of adding any technology app (in this case, REST app) by using Create Technology App option in the APPSeCONNECT Portal.
- You must mark the checkbox available if your chosen application is cloud-supported.
2. Schema Addition
In this step, you can add the data packet structure of any specific module of an application. As QuickBooks is the new tech app that we have created, we now need to create or import the Schemas. Creating schemas is a time taking process and here APPSeCONNECT eases the process by providing you the feature to import the schema where schema creation can be done within a couple of minutes.
Steps to add Schemas is given below:
- Navigate to App >> Click on (+) >> Schema.
- Navigate to Import >> Click on XML >> Add the file from the proper location >> Click on ‘Display’. The next screen which appears is:

- Choose the file of Contact.xml, provide the root element and click on display. Click here to know more about importing Schemas and Actions.
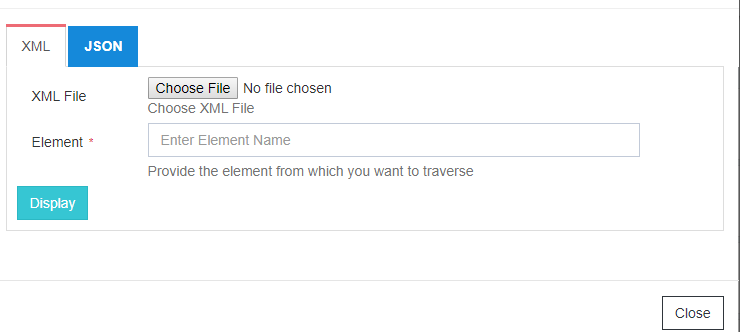
- Click Save, the schema now gets imported.
Note: Remember to set a unique attribute as ‘Primary key’ as it will generate the list of record ids in the resync bucket.
3. Endpoint Configuration & Action and Error filter Configuration
What is an endpoint and why do we need it for data integration? An endpoint is the name of the module which we want to access. The name of the Endpoint is the field that contacts the base URL to form a Base URL.
Endpoint Configuration
- To define the endpoint, navigate to App >> Click on (+) >> Schema >> Add Action(+). The window for Action appears.
- Endpoint – This is the module of the application; whose data needs to be integrated.
- Description – Details related to the action.
- Click the SAVE button.
Action Filter Configuration
- After saving the Endpoint configuration, the below screen appears. Now define the HTTP method, content type, required headers and parameters.
- Click on the Save icon after defining the header or parameter.
Note: Defining Header and Parameter varies from application to application. Some apps might need both the field inputs whereas, some may need Header/parameter - QuickBooks requires only parameters to fetch data from the app with respect to date and time. Thus, using the parameter ‘created’ as the key. The list of usable parameters is available in the API documentation.
- To get data with respect to date and time always define the value for that parameter or header to be ~{ReadDate(‘yyyy-MM-ddTHH:mm:ssK’,’0′)}~ where the key will be the name of the field or parameter [depending on the app used].
Note: Click here to know more about filters for generic REST integration. We also recently organized a webinar that covered the steps on how we can Embrace REST APIs through APPSeCONNECT!
Error Filter Configuration
- Now to define the HTTP method and content type same as the Action filter. This configuration will help to resync failed data records.
- Under the resource path section, in the key section provide the endpoint_name/$.
- Now click on the Save icon after defining the resource path. The value field will remain blank.
- Create another endpoint for Posting Operation. Choose the HTTP method to be POST and so on.
Note: Click here to know more about error filters for generic REST integration.
4. Connection Creation
- On the left menu of APPSeCONNECT, Click on Connections>> Create Connections>> Configure Connector. Steps to create a connection in APPSeCONNECT are given here.
- Provide the connection name and click on the check box for ‘Is Cloud Supported’ and then ‘Save’.
5. Workflow Creation
This is the section where you get a visual canvas where you orchestrate the business process that you want to achieve by integrating your chosen set of applications. Click here to know more about the creating touchpoint. Steps to design the workflow are given here.
Steps to Design Workflow and create touchpoint:
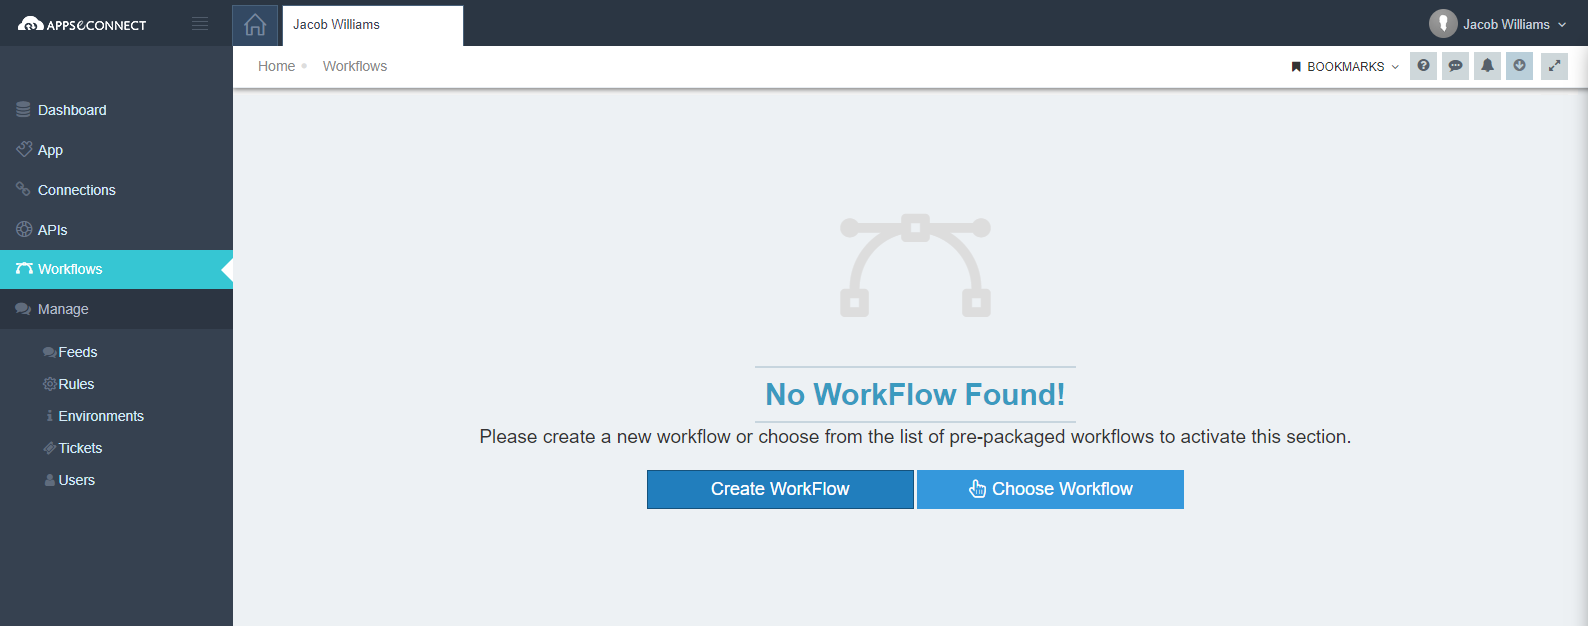
- Navigate to the Workflow page from the left navigation menu and create a workflow by clicking on the Create Workflow button. On opening, drag the Start node that depicts the start of the Workflow.
- In the workflow panel, you will find a template section where all the integration point templates are available for your perusal.
- Choose the appropriate template. Here the general template is dragged and used for the integration point
- Choose the connection. In this case, it will be QuickBooks and Shopify connection.
- Create the integration point by clicking on the “Create Touchpoint”
- The window for creating a new touchpoint opens.
- Provide all the necessary details:
- Information
- Source Setup
- Target Setup
- Transformation
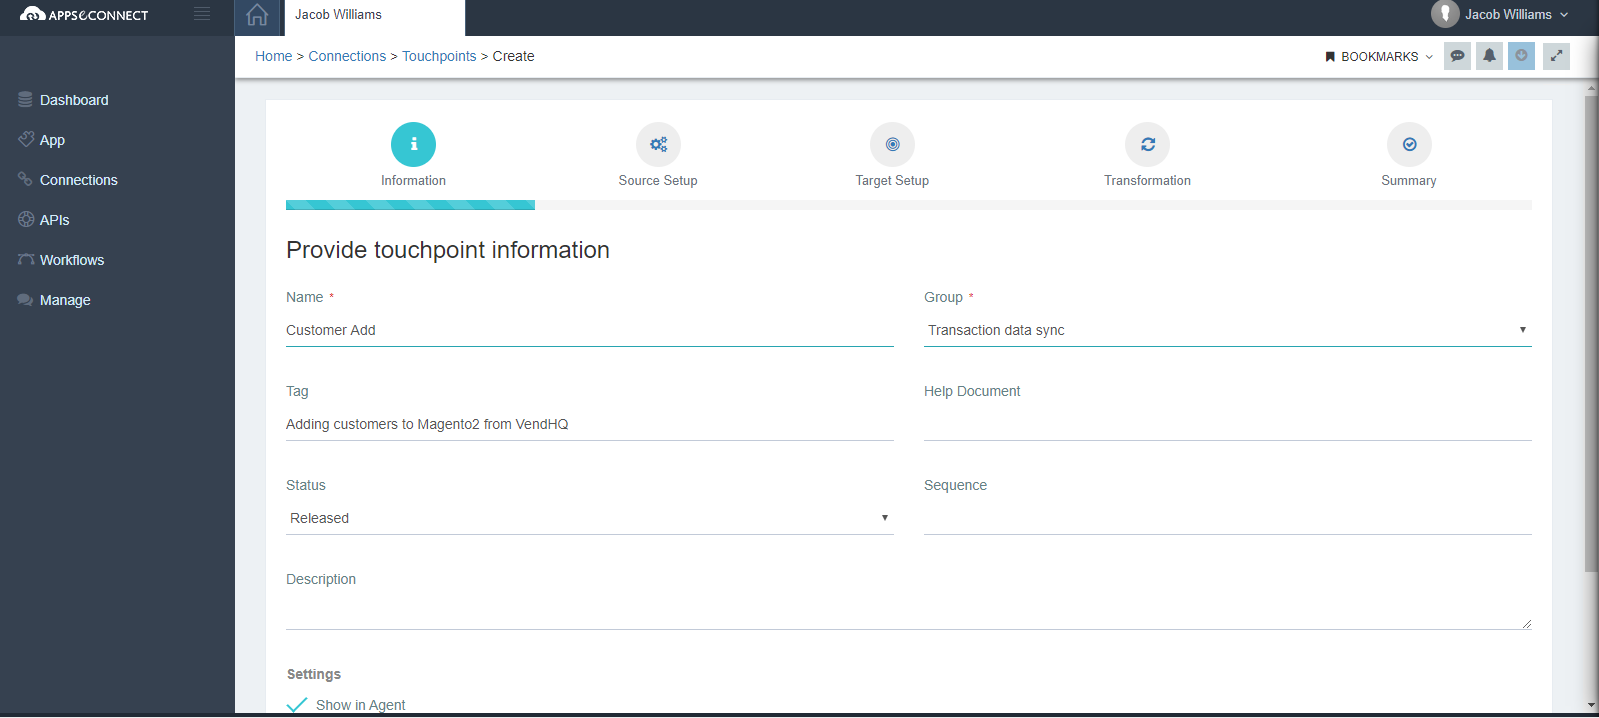
- On the main information page, you need to provide the name, group, tag, Status and settings.
- In the Source setup, define the source schema and action that has been created earlier. You also must select the protocol and method. Here I have chosen the protocol and method as REST.
- In Target setup, define the Target schema and action that has been created earlier. Here, also you must select the protocol and method. REST is chosen.
- The transformation page contains the mapping section where you can map the details of the source app to the schema of the destination app for the sync operation.
- The summary section is the overview of the touchpoint configure where you can confirm the details and save.
- After creating the touchpoint, join the nodes (Start, Touchpoint, Stop) to complete the design of the workflow. Save and Publish the workflow. The step to deploy a workflow is given here.
Mapping of the created touchpoint.
At the time of designing the workflow, you also need to configure the mappings between the source and target data fields. From the Workflow itself, you can derive the mapping between fields of both applications.
To know more, visit https://docs.appseconnect.com/transformation/overview/#process-of-transformation
Validating credentials for Generic REST Application – QuickBooks
- Navigate to the APPS section and click on the credential button.
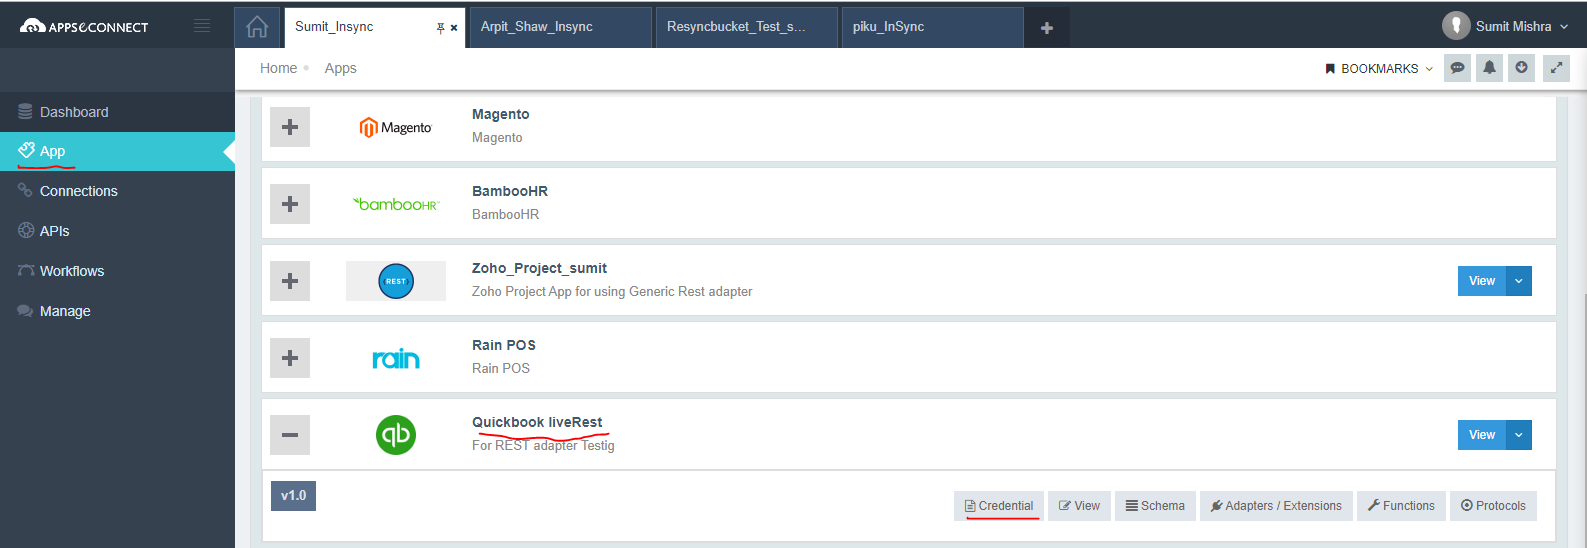
- The Credential UI opens. Click + button followed by clicking the Add New Credential button.

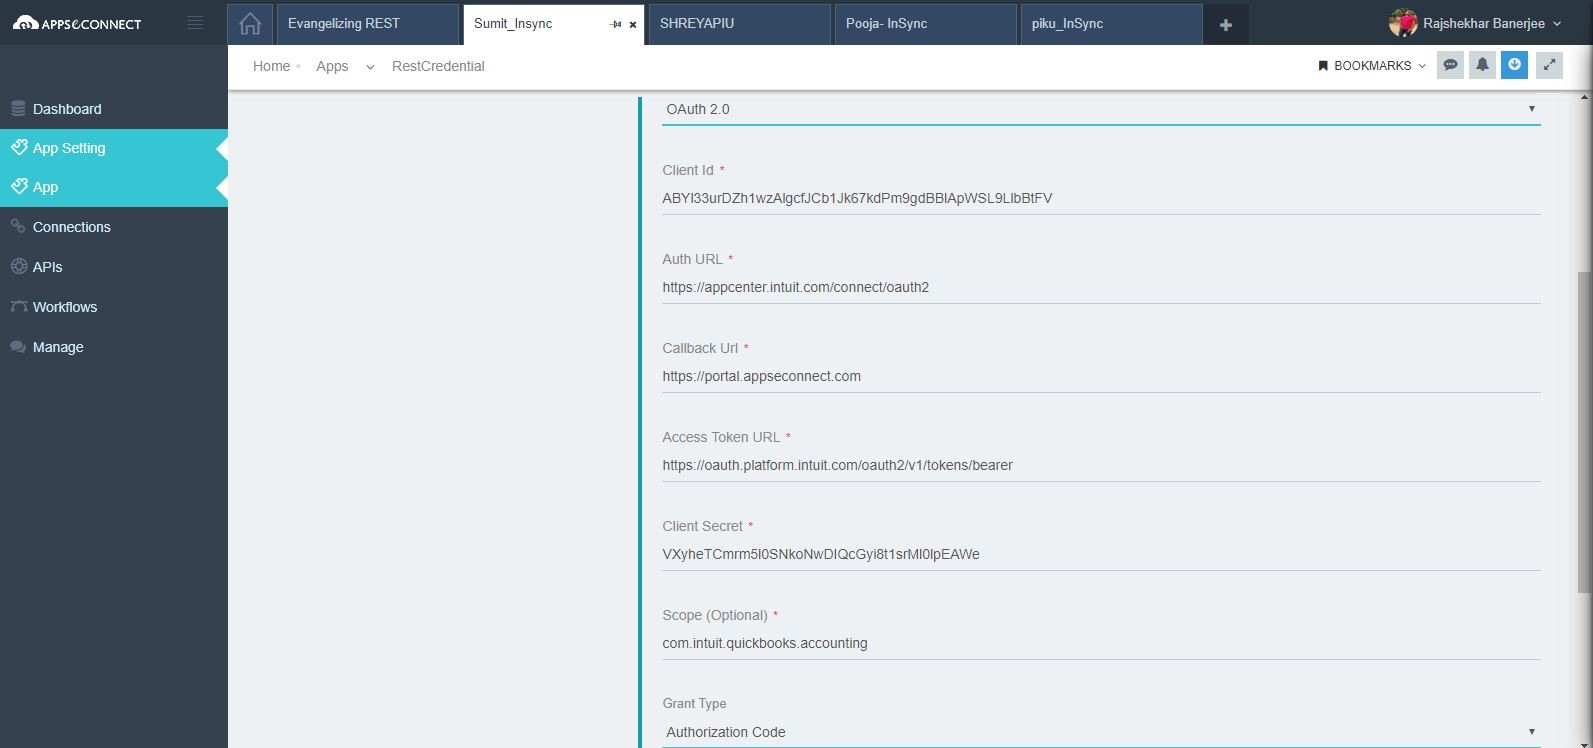
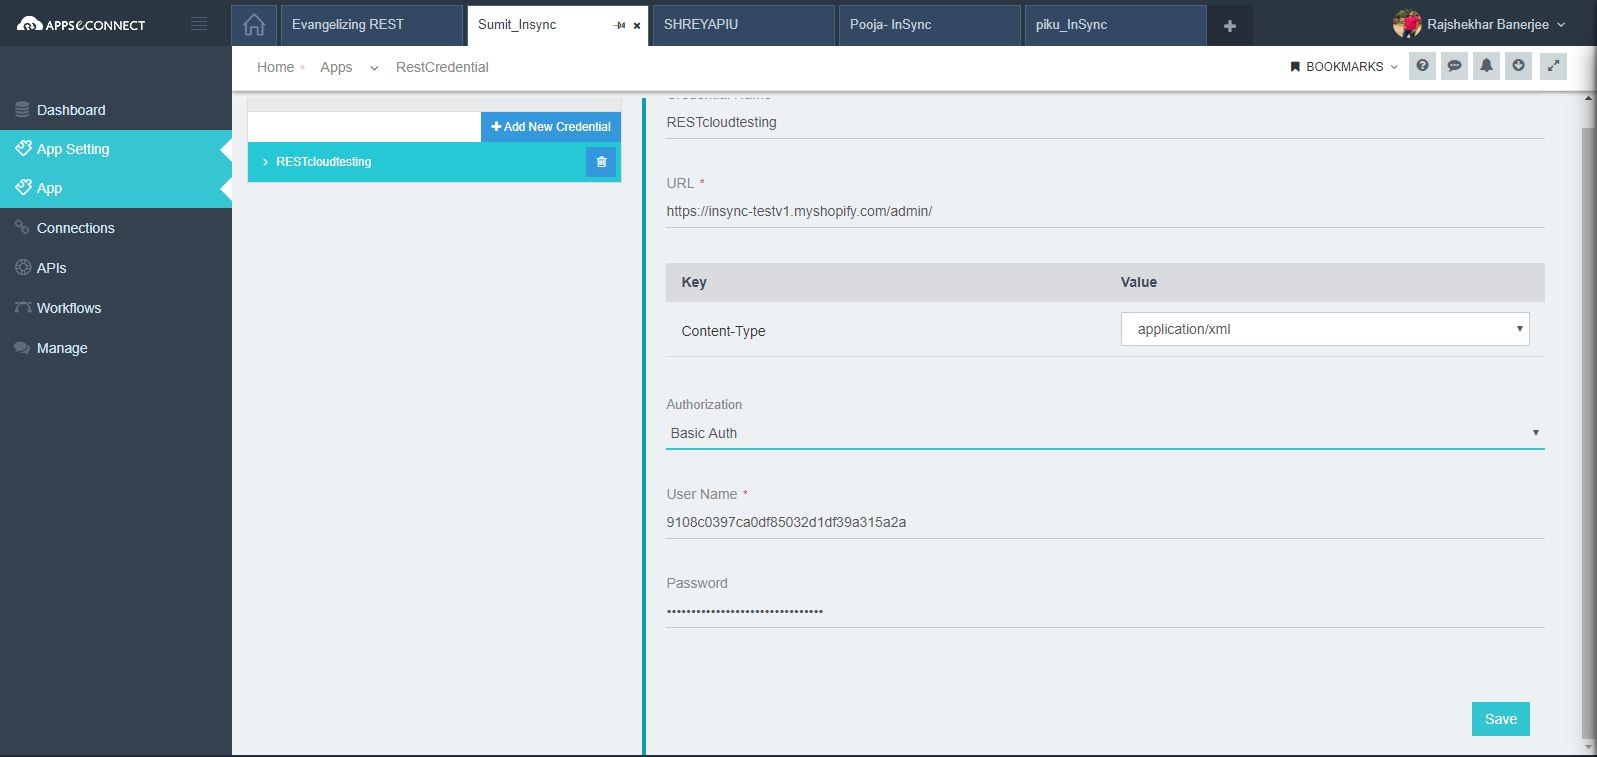
- Provide the Credential Name and the Base URL of the Application. Select the Content-Type: application/json or application/xml. Select the Authentication Type from the drop-down: Basic/ OAuth 2.0/ No auth.
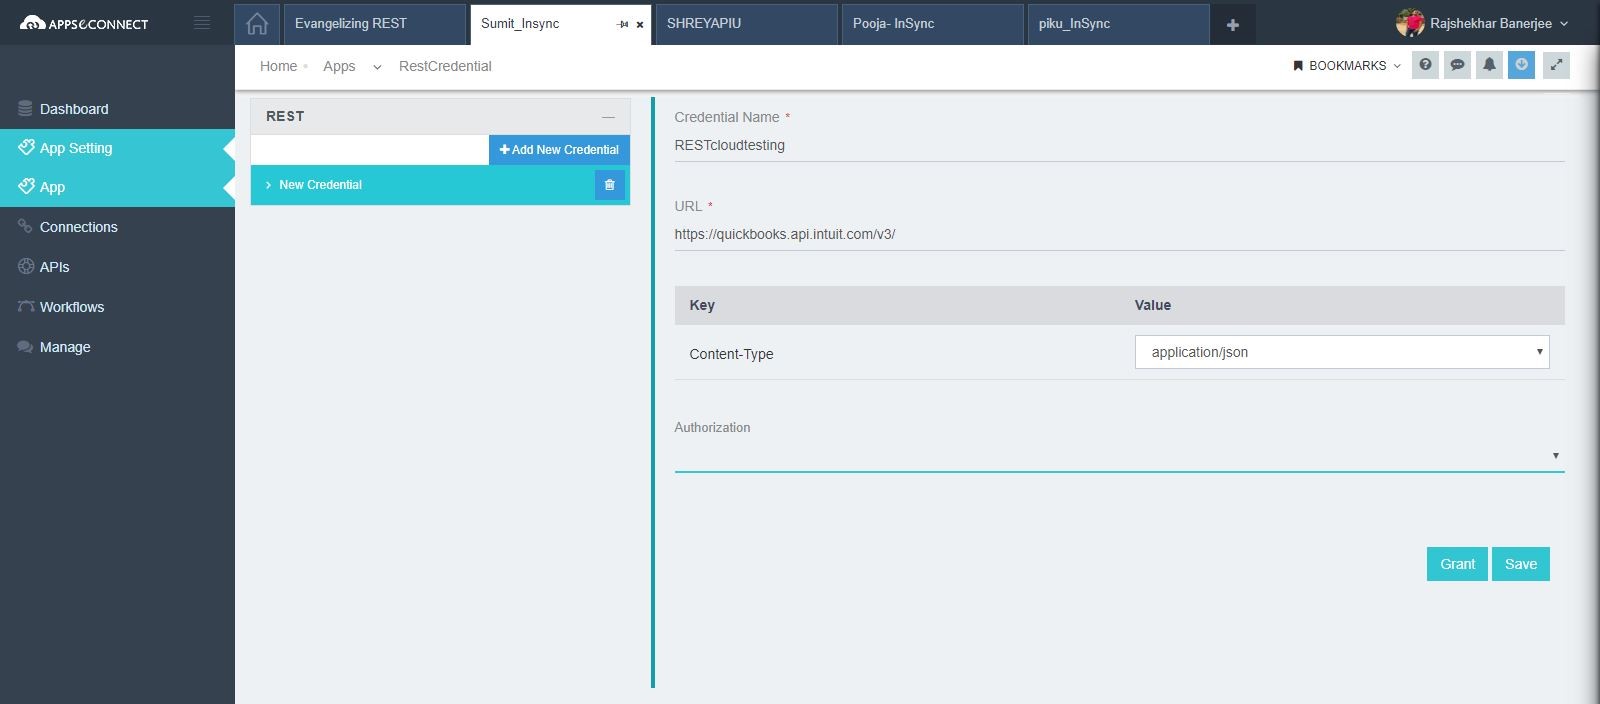
- Provide the details for OAuth 2.0 if your application supports OAuth 2.0 authentication.
- Provide the details for Basic Auth if your application supports Basic Authentication
7. Connection Deployment and Environment Setup.
APPSeCONNECT On-Premise Agent is a hybrid tool that sits on your own server and is configured on the cloud and does the actual data synchronization with the help of other concerned adapters while the Cloud Agent is a similar tool that performs the same function as the on-premise agent but is present on the cloud itself. No server is required to configure or sync using the cloud agent. Click here to know more about APPSeCONNECT Environments.
Follow the below steps to set up your cloud environment in APPSeCONNECT:
- Navigate to the Environments section available in the MANAGE section.
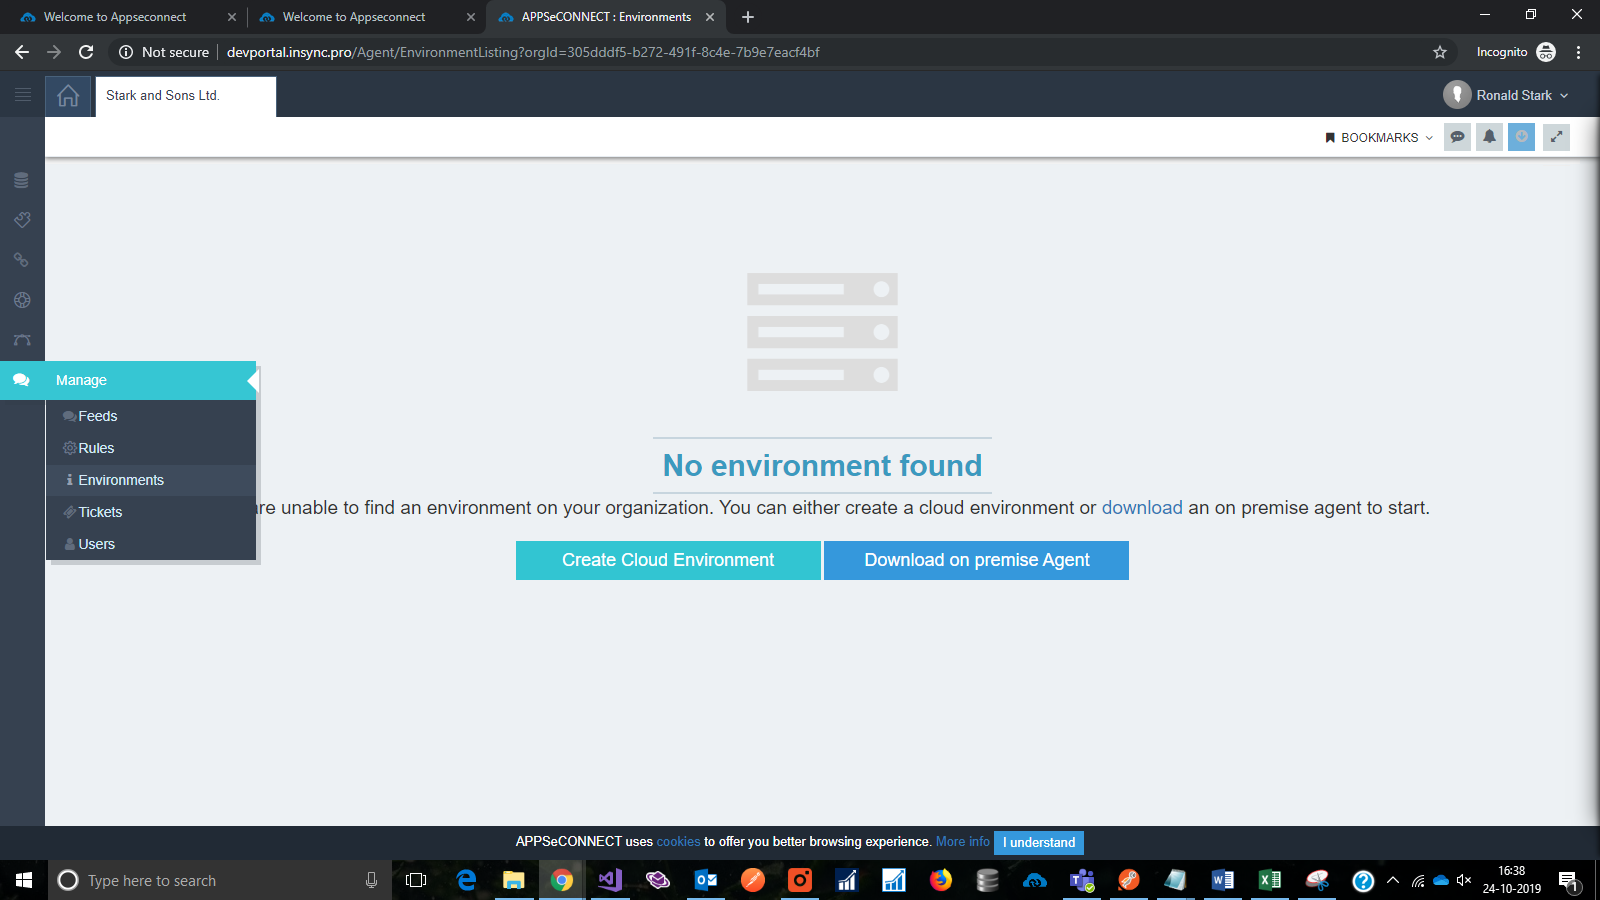
- Now click on the “Create Cloud environment” button
- Fill in the details as required and click on the Save button.
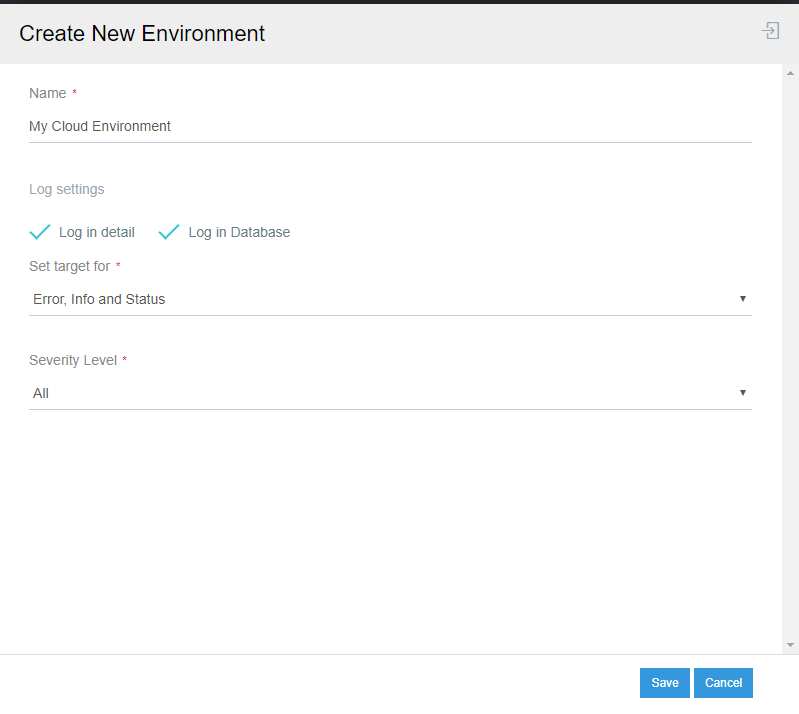
- On saving, the cloud agent would be available on the Environment listing page.
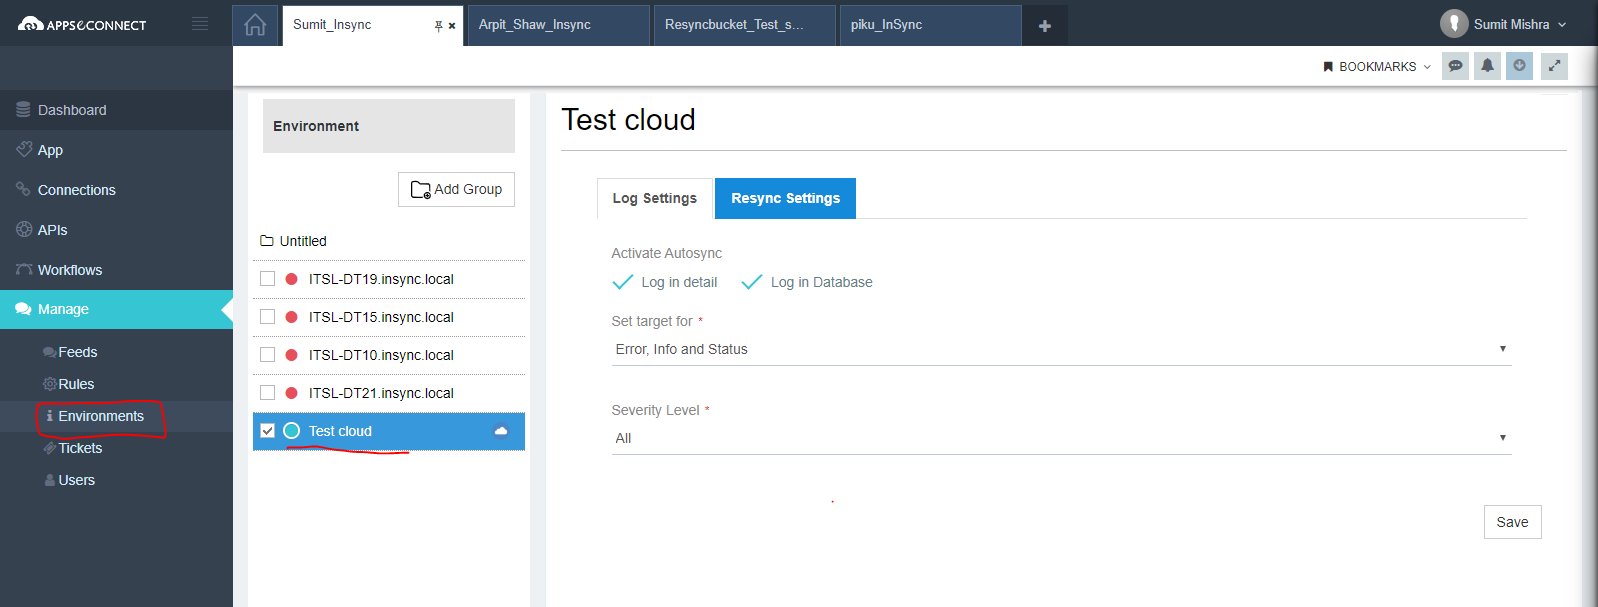
Note:
- If after saving details in step 3 you find access forbidden, then click on the “Request Access” button and you will be able to see your cloud environment after approval.
- Keep the cloud environment as “Primary Agent” by clicking on the checkbox beside your environment name.
8. Executing the Workflow
After assigning and completing the credentials and mapping, navigate back to the created workflow and click on the play button.
The workflow execution would be started for the created workflow.
In a similar way, you can create another workflow for integrating a different module or for a different operation (GET, POST etc.).
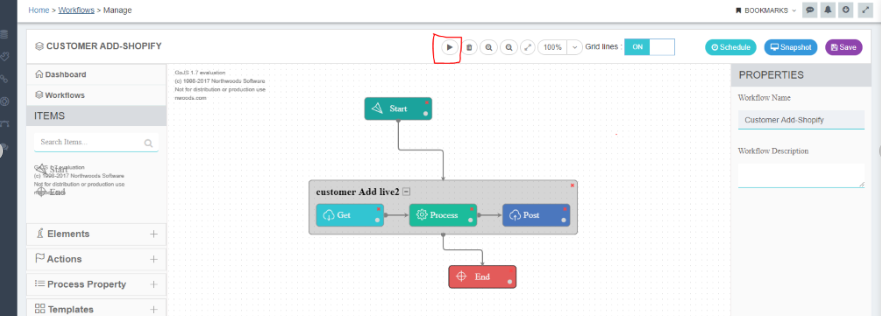
Click here to know more about deploying and executing workflows.
Conclusion
Whether you have the need to integrate data between one or more application, or you are looking for cloud migration, connectivity between applications are indispensable. With the opulent rise in the number of disparate applications, there is a need for tools that can handle hybrid and cloud scenarios with equal ease. APPSeCONNECT gives you the low code platform, where you can easily integrate any chosen applications.
So, as per the capabilities explained in the article, if you have shortlisted APPSeCONNECT as your platform, that aligns with your critical use cases, then feel free to visit www.appseconnect.com
Things to Remember
The complete article talks about the process of integrating the REST-based application – VendHQ and the Ecommerce – Magento2. Apart from Prerequisites, there are certainly more points or steps that must be done even when integrating with any other application. Those key points are given below:
- Valid credentials for logging into the APPSeCONNECT portal
- Selection of the applications which is needed to be integrated.
- Applying credentials and validating the application credentials for making both the applications communicate.
- Creation of the touchpoints with valid mapping of the attributes for valid data sync.
- Environment setups to be done based on which environment (Cloud or OP) the process needs to be executed. Click here to know more about environments.
- Presently, the REST Adapter supports two sets of content type conversion- XML and JSON &
Authentication Types that are supported are Basic/ OAuth 2.0/ No auth.
References
For APPSeCONNECT Integration reference, you can visit
For API reference, Authorization & Authentication, you can visit https://developer.intuit.com/app/developer/qbo/docs/develop
APPSeCONNECT is a smart and robust business application integration platform that seamlessly connects all your business applications with each other to streamline operations and facilitate the free flow of data across the platforms. By moving into the region of iPaaS, APPSeCONNECT proves to be a best-in-the-class platform that easily connects systems and automates the business process.
Now, you can easily connect all your business applications under one single platform to automate the business process and increase your productivity and efficiency!


