


What is the most proven way to motivate your online store visitors into buying more?
What is the best way to reward your loyal customers?
How can you get rid of old inventory fast?
The answer to all the three questions is a good ‘’discounted offer’’. It has always been a trend to treat to existing loyal customers with discount coupons from time to time. Discounts are often given to entice customers to buy more. Promotional pricing has also proven to be a good way to lose out surplus stock before bringing in new collection. Now, if you are planning to use Prestashop 1.7 as your eCommerce platform this article will help you set up pricing/discount rules for your online store in no time.
There are two ways in which you can set up discounts in Prestashop –
-
Catalogue Price Rule
-
Cart Rule
Let’s start with Catalogue Price rule first.
Catalogue Price Rule
Go to Catalogue > Price Rules
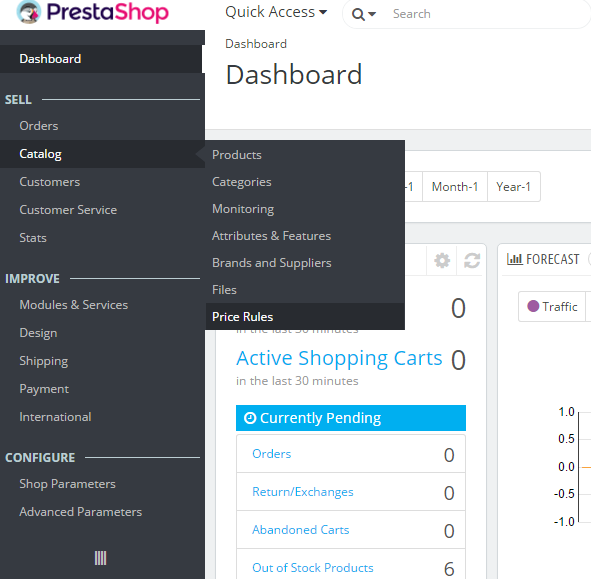
Click on Catalogue Price rules tab and then click on “Add new catalogue price rule”
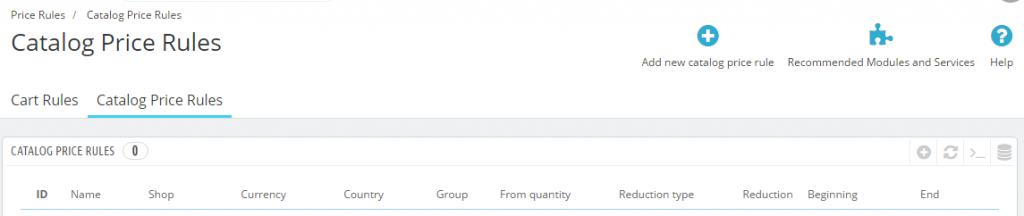
A new page would open up to let you define a new catalogue price rule.
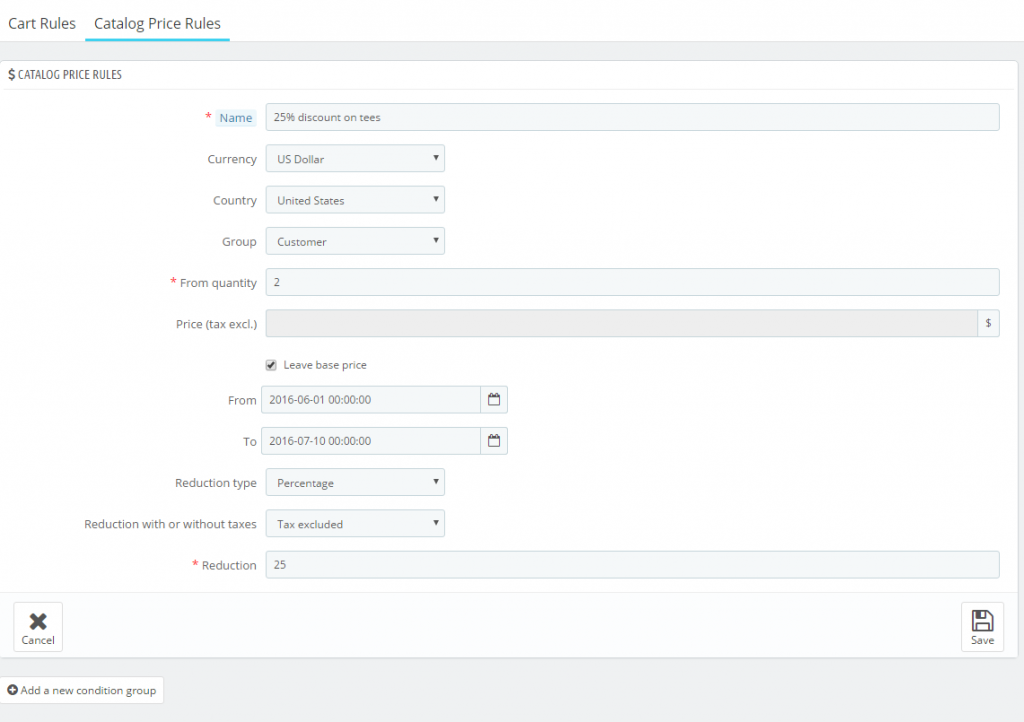
Name – Give a name to your promotional offer e.g. 25% discount on tees. Only you would be able to see the name from the backend so you can name it as you wish for your own reference.
Currency – You can select if you want the discount to be provided only when the item is being purchased in dollar or any other currency. Select the desired option from the dropdown.
Country – If you want the discount to be provided to customers from a specific country, you can select it in this dropdown. Else select All Countries.
Group – The value in this field can be used for different scenarios. If you simply do not want un-registered or guest customers to avail the discount, select “Customer” from this dropdown. So only registered customers will be able to avail this offer.

Also if you are using the Prestashop store on B2B model you can have multiple groups created (e.g. wholesale/retail or gold customer/silver customer). Then you can allocate this discount offer to a specific group.
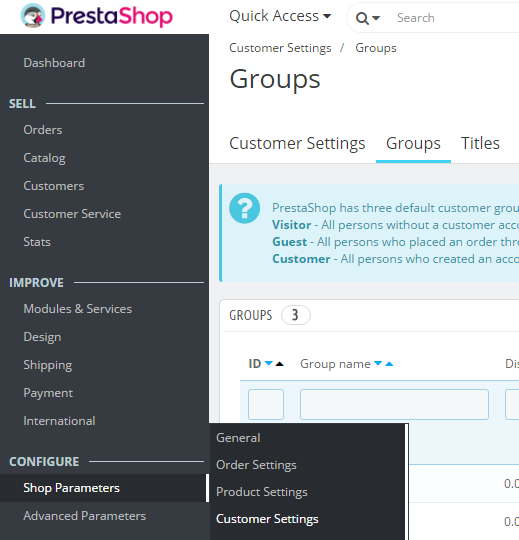
You can create customer groups here –
Configure > Shop Parameters > Product setting > Groups tab
Now, back to the page where you were defining the Catalogue price rule.
From Quantity – You can define how many units of an item a customer needs to purchase to avail this discount. You give 2, and the customer would need to buy 2 or more units of a particular item to get the discount.
Price(tax excl.) – There are two options with this field and two possible outputs.
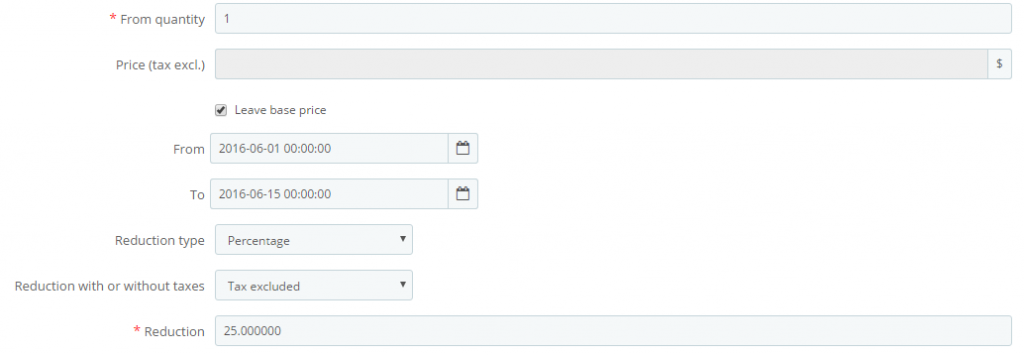
All the products that would be considered for this Catalogue price rule have a predefined base price. For example, for a Women’s tshirt the price could be 80 USD. Now, if you want to show that the base price is 80 USD and a 25% discount is being given then leave this field blank and tick the check box Leave base price. Fill the Reduction field with 25%. At the front end the customer would see 80 USD stroked off and the updated-discounted price of 60 USD.

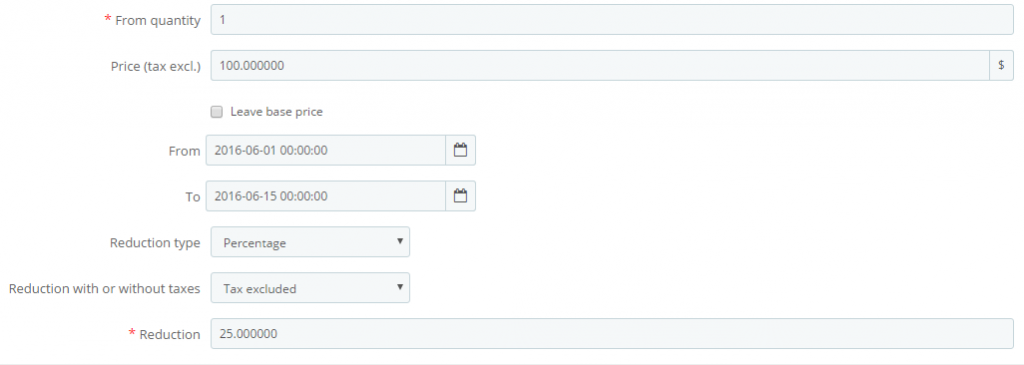
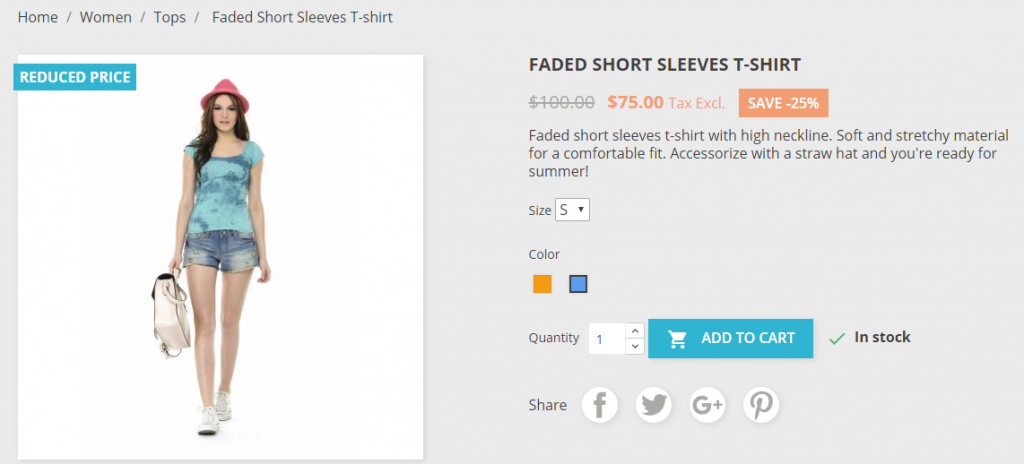
Alternatively, you might wish to change the base price of all the items that meet the condition for this rule. Then uncheck the checkbox for Leave base price and fill in this field with the desired value. You might want to show a slightly hiked price and then give a discount. So for example the existing base price for the Women’s tshirt might have been 80 USD. Now, once you give 100 in this field and 25% in the Reduction field, at the front end customers will see 100 USD stoked off and the updated-discounted price of 75 USD. Note that it will not show its pre-existing base price of 80 USD at all.

From – To – Here you can select the start date and end date within which this discount rule will be applicable.
Reduction type – There are two options. If you wish to have the discount amount calculated as a percentage of the product’s base price, select Percentage. If you wish to have a fixed value deducted from the base price, select the option Amount.
Reduction with or without taxes – Decide if you want to have the discount provided on the tax applicable on the product as well.
Reduction – As explained above this is the field where you have to put in the value for the discount you wish to offer. If Amount is selected in Reduction type before then the value of this field will be directly subtracted from the base price of the product. Else a percentage amount of the product’s base price will be deducted from it.
Now, if you want this rule to be applicable for all products in your store then click on Save and you are done with creating a Catalogue price rule. But if you want to have the discount on selective items based on categories, manufacturer, colors and other attribute values you have to define conditions.
Click on “Add a new condition group”
Here, you can define multiple conditions for your catalogue price rule to be applicable.
For example, you can choose to have this rule to be applicable for products in the T-shirt Category only. So you will have to select the T-shirt option from the Category dropdown. Then click on the Add Condition tab on the left.
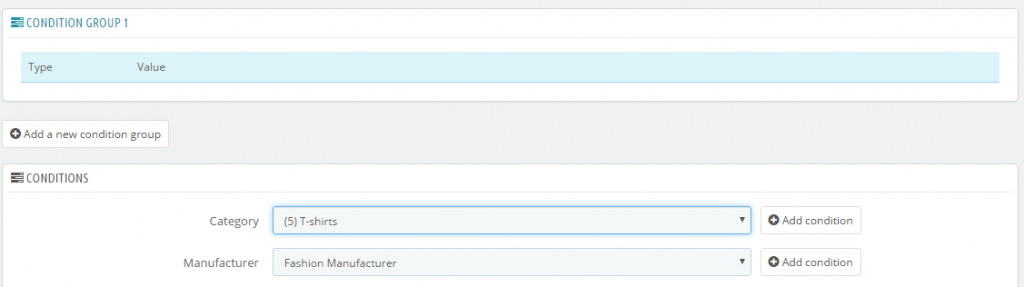
You can select multiple criteria in one condition group. For example, you can define that not just all products from the T-shirt Category but the ones with blue color will only be applicable for this discount rule.
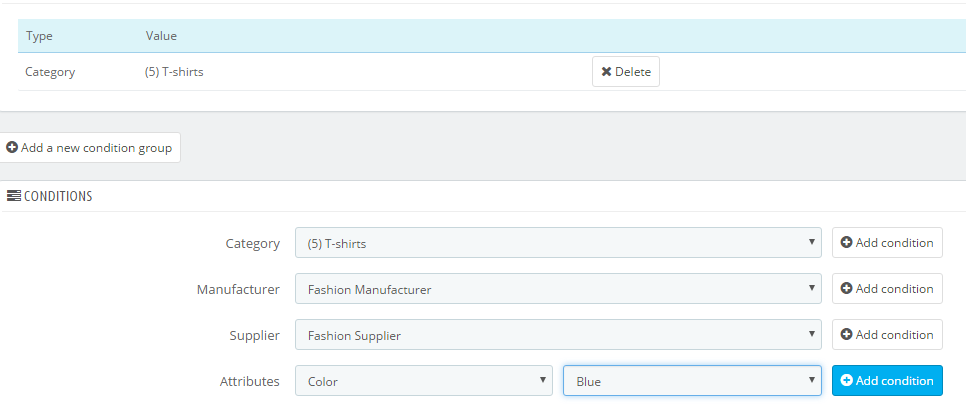
For saving the rule you can click on the Save button above the Condition group window. Note that if you define two criteria in a Condition group both has to be satisfied by a product to qualify for the catalogue rule. You can create another Condition group by clicking on “Add a new condition group”.
If you set up two condition groups, either all the criteria of group 1 has to be satisfied or all of group 2 has to be satisfied for the product to qualify for the discount.
So this is all about having discounts to be made applicable on products while they are showcased in the catalogue. Now, lets move to Cart Rules which will enable you to offer discounts on the cart total.
Cart Rules:
Go to Catalogue > Price Rules and then click in Cart Rules tab.
Click on “Add new cart rule”

A new page would open up to let you define a new Cart rule.
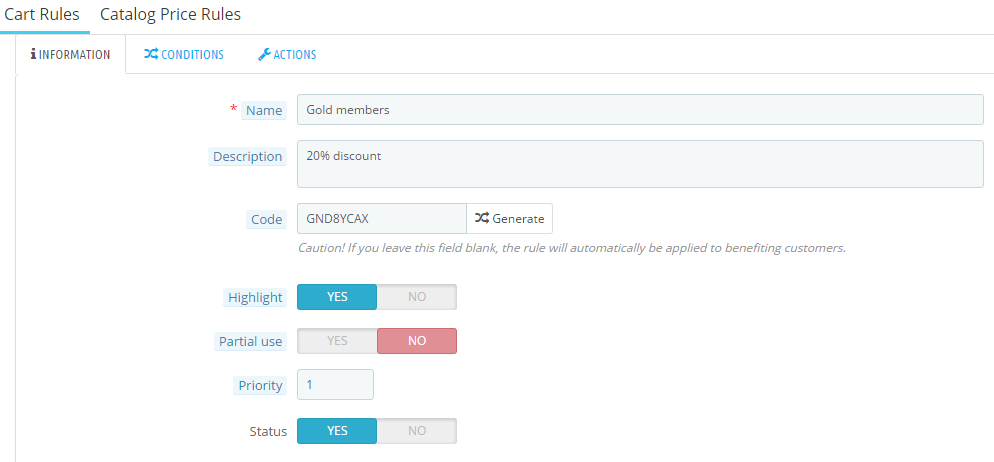
Name: This name will be shown on the Cart page after the rule is applied so name it accordingly.
Description – The description would only be visible to you, so you can name it as per your wish for future reference.
Code – You can create the coupon manually by typing in a desired format. Alternatively, you can have Prestashop generate one for you. Click on Generate and you would have a unique voucher.
Highlight – If you want your customers to know that a voucher is available and its applicable on their current cart elements you should select Yes here.
Partial use – If you disable this, the voucher can be used only once by a customer, no matter he gets to utilize the entire discount in that purchase.
Priority – In case multiple coupons are applicable on an order and the customer tries to use them the priority of this rule will considered for making this one applicable.
Status – Select Yes/No to determine whether the voucher would be active or inactive.
Now, go to the Conditions tab.
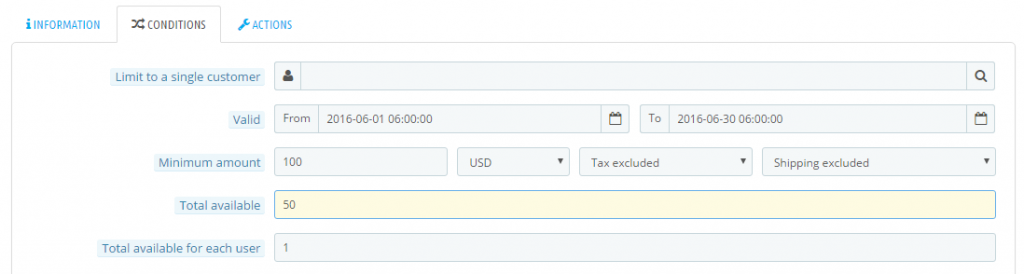
Limit to a single customer – Though ideally you might not want to create a voucher specific to a customer, but if you wish you can do it. Just select one from your existing list of customer who would only be able to use this voucher.
Valid – Select the time period within which the voucher will be usable.
Minimum amount – Here you can define what should be the minimum cart value (Order value) for this voucher to be applicable.
Total available – You can define the usage limit of the voucher. If you put in X here, it would mean this voucher can be used by X no. of customers or X times.
Total available for each user – You can limit how many times one customer can use this voucher to place orders. If you select ‘1’ here then the Total available value (X) set above would mean X no. of customers can use the voucher.
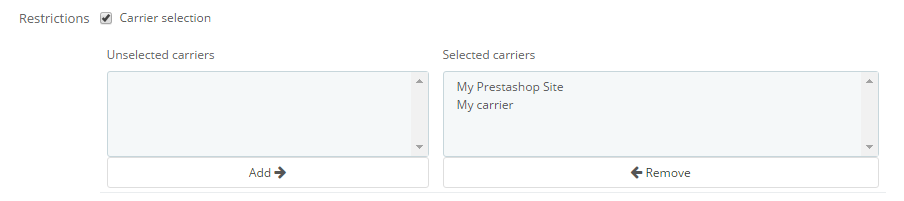
Restrictions – Three criteria can be set up based on what carrier, customer group and product is associated with the order.
Carrier selection – The voucher can be made applicable based on which carrier/shipping method is chosen by the customer. You can click on Add/Remove to only have the desired shipping option under Selected carriers panel.
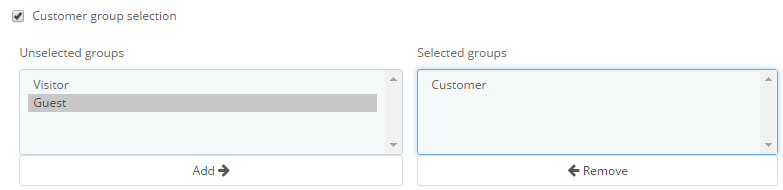
Customer group selection – If you wish to only allow the registered customers to be able to use the voucher select the Guest and Visitor groups and remove them from the Selected groups panel.
Product selection – The criterion to have the voucher applicable can also be based on specific products/product attributes/product categories/manufacturers etc.
For example, if you wish to have the voucher applicable only when items are purchased from a specific Category e.g. Casual Dresses, first select Categories from the dropdown Add a rule concerning.
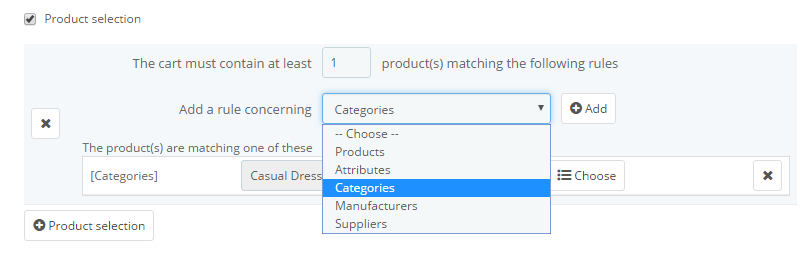
Then click on Choose and you will see the list of Categories in a highlighted window. Select the desired Category and click on Add to have it moved to the Selected panel.
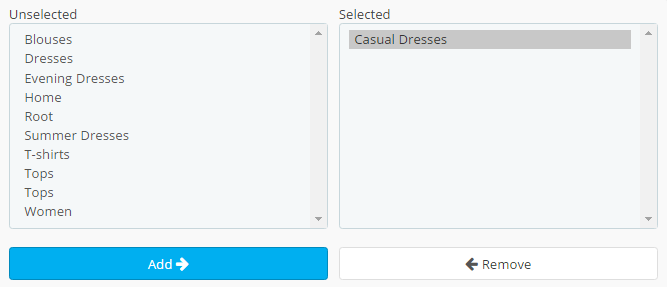
You can select multiple categories in the panel or even create compound criterion in combination with product attribute. Click on the button Product selection for creating a whole new condition where you can define criteria based on per-product, per-categories, per-manufacturers or per-attribute options.
Next, you have to go to the Actions tab.
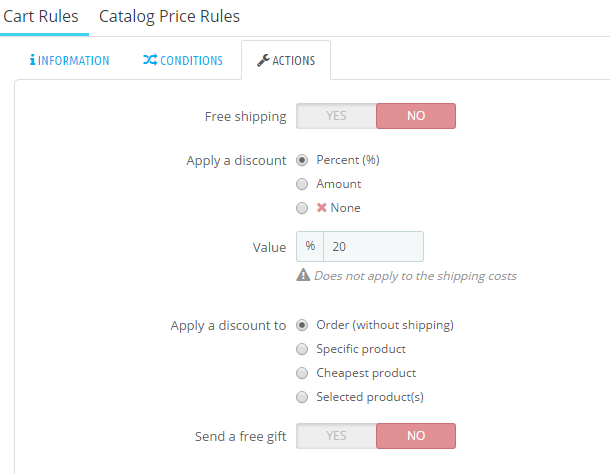
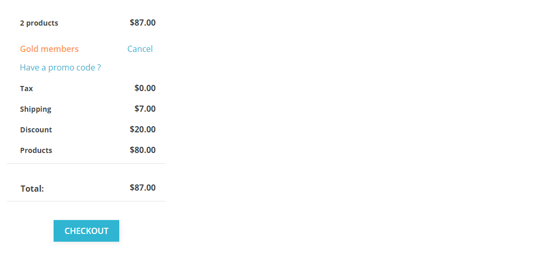
Free shipping – If you want the customer to get free shipping on usage of this voucher select Yes.
Apply discount – If you wish to have the discount amount calculated as a percentage of the cart total, select Percent. If you wish to have a fixed value deducted from the cart total, select the option Amount.
Value – Put in the desired discount figure you want the customers to get.
Apply a discount to –
Order (without shipping) -The discount will be applied on the cart total.
Specific product – You can specify the product on which the discount will be applied from among the other products in the cart.
Cheapest product – The discount will be applied on the product with the lowest price from among the other products in the cart.
Selected product(s)– The customer would be able to opt for products on which the discount would be applied. This option is only available when the “Percent (%)” option is selected for Apply Discount.
Send a free gift – In case, instead of giving a discount to the customer you wish to give away an item for free you can select ‘’Yes’’ here and choose one item. Type in first few letters of that item in the search box below and the name will auto populate.
Click on Save and you would have a Cart rule with a coupon code created successfully.
If you wish to know how you can connect your Prestashop store with your backoffice ERP system we have the right solution for you. Even orders placed during promotional campaigns can also be recreated in your ERP accurately including shipping and tax details.
You may also like
Prestashop 1.7.1 Released: 7 Things you need to Know
How to install Prestashop on WAMP server localhost
PrestaShop Security Release Announcement
Prestashop Success Story- From 2007 till now